Software Stack Deployment
This page will go through how to get started with the software stack installation. We will break down the process into pre-requisites, local infrastructure, with two stages of configuration and deployment, and finally the centralized infrastructure.
Note
The centralized infrastructure is not required for the local infrastructure to work, but it is recommended for larger projects with multiple sites and a large amount of data.
Pre-requisites
As explained in the hardware requirements section, the BIDS-flux infrastructure recommends using two local servers and one centralized server to ensure secure and efficient functionality. One server should have ample storage and moderate compute power, while the other should have limited storage but high computational power. The centralized server should have robust storage and sufficient computational power to handle data from all sites.
Both local and centralized infrastructures will rely on docker , specifically using docker-compose and docker swarm mode to run the services. Super user permissions will be required. Additionally, both local and centralized servers/VMs will use DataLad (which wraps Git and Git-annex) for data management and version control. Docker swarm mode was selected to take advantage of the built-in secret features and the ability to scale services across multiple servers if necessary.
Install Docker on all servers/VMs by following the official Docker documentation for your specific Linux distribution: install docker and docker compose. You can verify the installation with the following command:
sudo docker --version
sudo docker run hello-world
Install DataLad in all the servers/VMs. Follow the official documentation to install Datalad for your correct linux distribution. You can run the following command to check if git is installed correctly:
datalad status
Note
Git and Git-annex will need to be installed for datalad to work properly. Carefully follow the instructions in the DataLad installation guide to install them.
Local Infrastructure
Each local server/VM will need to have docker engine running which we will use to initialize a docker swarm. The recommended breakdown is to use two servers and divide the services as follows:
Data Server:
GitLab
GitLab - Runner (Docker-in-Docker)
MinIO
Mercure / StoreSCP
Processing Server:
GitLab Runner
On the
Data Serveryou will run the following command to initialize thedocker swarm manager node.docker swarm init --dport 9789
This command will initialize the docker swarm and will return a token that you will need to run on the
Processing Server. The output should look something like this:Swarm initialized: current node (dxn1zf6l61qsb1josjja83ngz) is now a manager. To add a worker to this swarm, run the following command: sudo docker swarm join \ --token SWMTKN-1-49nj1cmql0jkz5s954yi3oex3nedyz0fb0xx14ie39trti4wxv-8vxv8rssmk743ojnwacrr2e7c \ --advertise-addr 192.168.99.100:2377 To add a manager to this swarm, run 'docker swarm join-token manager' and follow the instructions.
Warning
Be aware of the issues with docker swarm in a VMWare virtual machine.
Note
Make sure that your network is configured correctly and that the
dataandprocessing servers/VMscan communicate with each other on the required ports by docker https://docs.docker.com/engine/swarm/swarm-tutorial/#open-protocols-and-ports-between-the-hosts.Go into the worker node (
processing server) and run the following command with the information obtained from the previous command.docker swarm join --token TOKEN --advertise-addr <IP-ADDRESS-OF-WORKER-1> <IP-ADDRESS-OF-MANAGER>:2377
Create an attachable docker overlay network. This network will be used by all the services to securely communicate to each other.
docker network create --driver=overlay --attachable BIDS-flux-net --gateway=192.11.0.2
Once you have Docker, Git installed, and the docker swarm configured, you can start deploying the services. You will need to clone the software stack git repository which contains the docker-compose yaml files to deploy the services into the manager node in this case this will be the
data server.git clone https://gitlab.unf-montreal.ca/bids-flux/local-stack.git
Note
You can also clone the following repositories to keep your repositories up to date with following releases:
git clone https://gitlab.unf-montreal.ca/bids-flux/containers.git
git clone https://gitlab.unf-montreal.ca/bids-flux/ci-pipelines.git
The deployment of the services will be mostly automatic, nevertheless, there will still be some manual configurations that will require careful attention to detail.
Configuration Stage 1
Change directory into the
local-stackcloned repository and follow the next steps.cd local-stack
The
.envfile will need to be set up with the proper DOMAIN_NAME of the Docker Swarm nodes where the individual services will be deployed. Once again, for BIDS-flux, the recommended breakdown is:Data Server: GitLab, GitLab - Runner (Docker-in-Docker), MinIO, Mercure / StoreSCP
Processing Server: GitLab Runner
This is an example of what the
.envfile should look like:# This is an example of what you will want to configure DOMAIN_NAME=data-server.org DICOM_ENDPOINT_HOST=data-server.org GITLAB_HOST=data-server.org STORAGE_SERVER_HOST=data-server.org PROC_SERVER_HOST=proc-server.org
The
.envfile also contains information regarding the directory were in the filesystem will the infraestructure be storing all its data for future backups.# This location is usually standard but feel free to modify is required GITLAB_HOME=/srv/gitlab MERCURE_BASE=/opt/mercure MINIO_HOME=/mnt/minio-disks
Warning
Mare sure that the directories exist, otherwise docker wearm will fail to start the services.
If you are using the recommended Mercure, you will require to configure some fields of the
config/mercure-conf/default_mercure.jsonto:The Modules field in the json file to properly point to the dicom-indexer image.
The environment variables to be used for this containers.
The docker arguments including the docker command to run.
Any necessary directory bindings for this container.
Note
This step can be manually finetunned using the Mercure GUI once Mercure has been installed.
Note
You may have noticed that the mercure service is not included in the `` BIDSflux-stack.yml`` file, this is okay. Currently,
Mercureneeds to be installed using docker-compose as opposed to docker swarm, but don’t worry, we will install it right after.
Stack Deployment Stage 1
One you have completed the initial configuration, we need to deploy de secrets for the docker-warm services by running the
deploy/generate_secrets.sh. This command will create the secrets required for the deployment of the services.bash deploy/generate_secrets.shImportant
The secrets will only be displayed once so make sure to store them in a safe place.
You will need to run the following command to initiate the docker swarm for the BIDSflux infraestructure. This will create a new docker stack where the docker swarm services will be deployed.
sudo docker stack deploy -c BIDSflux_stack.yml BIDSflux
Note
It takes some time to finish up downloading the images and deploying the services.
You can confirm the docker stack initialization by checking the individual services.
sudo docker services ls
This should return some information of the deployment status, for example, the gitlab service.
ID             NAME                      MODE         REPLICAS   IMAGE                                                                             PORTS
jhyou70vh0zz   BIDSflux_gitlab               replicated   1/1        gitlab/gitlab-ee:17.7.1-ee.0                                                      *:80->80/tcp, *:222->22/tcp, *:443->443/tcp, *:5050->5050/tcp
What we care about the most is the REPLICAS as it tells us how many of the asked deployments are successfully up and running. You can also run the following command to get the service logs.
sudo docker service logs BIDSflux_gitlab
Note
If you see
REPLICASas0/1this means that your deployment is ongoing or that there was an error with the deployment. If you encounter issues make sure that the Docker Swarm ports are open between the servers/VMs, and that the directories specified in the.envfile exist. You can get more information using the following command.sudo docker stack ps BIDSflux --no-trunc | grep <Service with 0/1 replicas>
You now should have all BIDSflux services running with 1/1 replicas, so, it is time to move to the next configuration stage.
Configuration Stage 2
Run the
mercure-setup.shscript in preparation for the Mercure deployment, this script will create some of the required directories and assign the correct USERNAME and permissions for mercure to run properly.bash mercure-setup.shWe need to create a root user
GITLAB_TOKEN. For this you will need to go to your browser and open the GitLab instance, log in, and create aGITLAB_TOKENthat we will need for the following steps. You can do this by going to the URL defined by yourDOMAIN_NAMEin the.envfile.”https://<DOMAIN_NAME>:443
You will need to log in using the following credentials:
username: root
password: <gitlab_root_password> #as it was created using the deploy/generate_secrets.sh script
Once you are logged in, go to the settings and create a new personal access token. Make sure to select the following scopes:
api
read_user
read_repository
write_repository
read_registry
write_registry
read_package
write_package
admin_mode
The next step is to run the
deploy/init_ni-dataops.pyand thedeploy/runner_registration.pyscripts to configure required users, tokens, variables, groups, clone the necessary resositories from the BIDS-flux, and the registration of the processing workforce thegitlab runners. Follow these steps:You will need to declare the following variables in your shell environment:
GITLAB_TOKEN #this was defined in the previous step where we created the personal access token.
BOT_EMAIL_DOMAIN #this can be an email domain of your choice, but it is recommended to use the same as the
DOMAIN_NAME.
Important
If you do not have python installed, you must install it using the appropriate packages for your linux distribution.
Create a python environment to install the required python packages to complete the configuration using the
deploy/python-env.txtfile. You can do this using the following command:
python3 -m venv --system-site-packages /path/to/specific/directory/env
source /path/to/specific/directory/env/bin/activate
pip install -r deploy/python-env.txt
Figure out what are the docker containers that are running the gitlab runners so we can use this information to register the correct runners in the correct servers. The dind runner will be running in the data server and the proc runners will be running in the processing server.
sudo docker ps | grep gitlab-runner
Once you have the python environment created and activated. You need to run the following script twice, once to register the dind gitlab runner which will handle tasks that require running docker inside a docker container like when building images inside a docker container; and a second time to register the untaged, bids, and processing runners which will handle the main pipeline tasks like DICOM to BIDS conversion, and the running of derivative pipelines:
python deploy/runner_registration.py ~/.docker/config.json deploy/runner_configuration.json BIDSflux_gitlab-runner.x

python deploy/runner_registration.py ~/.docker/config.json deploy/dind_runner_configuration.json BIDSflux_gitlab-runner-dind.x
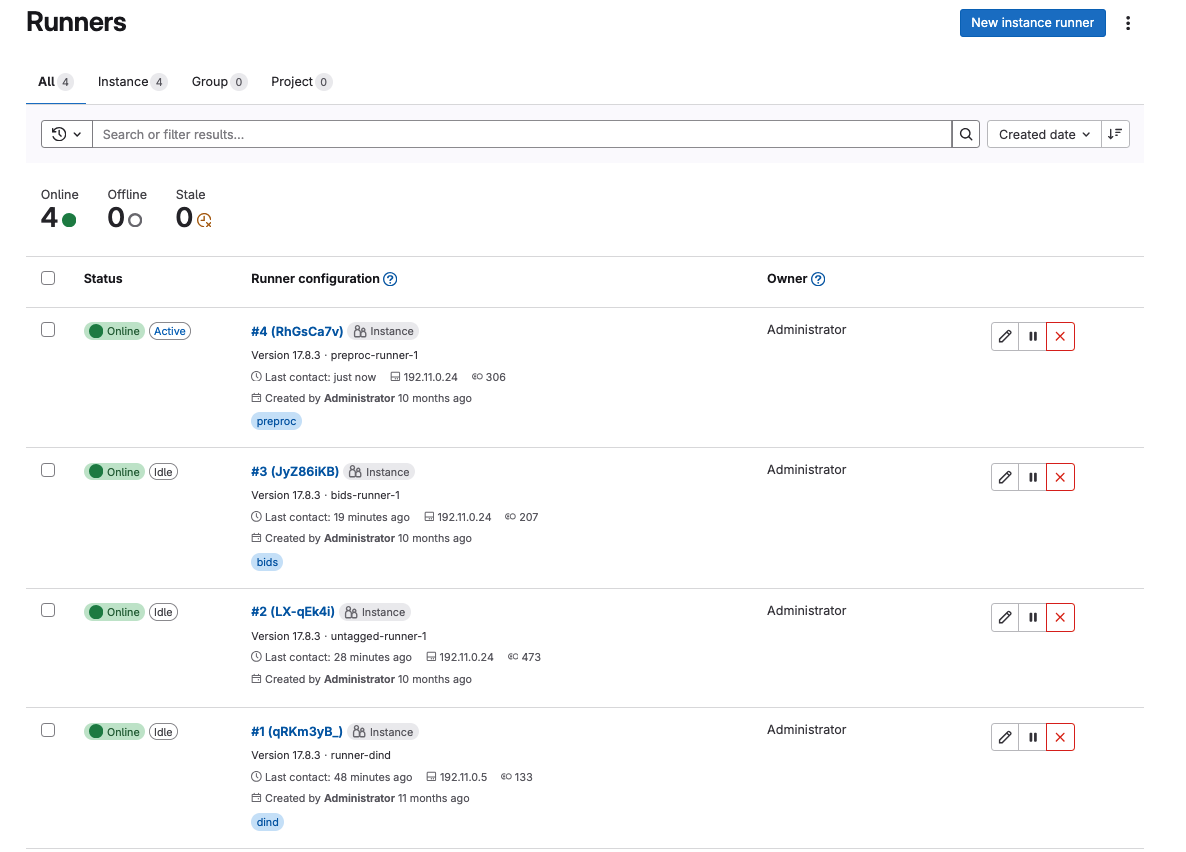
You can verify that the gitlab runners were registered correctly by going to the GitLab instance and checking the instance-wide runners in the amdin page settings.
On the left sidebar, at the bottom, select Admin.
Select CI/CD > Runners.
You should see something like this:
After successfully registering the GitLab Runners, you can run the script which will finalize the configuration of the local GitLab instance. This script will show you two tokens that you will need to store in a safe place. The first token is the
GITLAB_BOT_TOKENwhich will be used to push the data to the GitLab instance, and the second token is theBIDS_API_TOKENwhich will be used to provide access to the data in the pipelines.python deploy/init_ni-dataops.py --ci_config_path deploy/ci_variables.json
Important
Make sure that you safely store the
BIDS_API_TOKENand theDICOM_API_TOKENas you will require them for the next steps.
If you are using storescp instead of mercure you will need to properly configure these
.envvariables.# Required if you are using storescp an not mercure, if using mercure these will be configured someplace else GITLAB_REGISTRY_PATH=registry.gitlab.${DOMAIN_NAME}/ni-dataops/containers S3_URL_PATTERN='s3://s3.data-server.org/test.{ReferringPhysicianName}.{StudyDescriptionPath[1]}.dicoms' GITLAB_INDEXER_GROUP_TEMPLATE="{ReferringPhysicianName}/{StudyDescriptionPath[1]}"
CI_SERVER_HOST: The URL of the GitLab instance where the data will be pushed. Make sure to change the DOMAIN_NAME_PLACEHOLDER to the correct domain name.
S3_URL_PATTERN: The URL pattern for the S3 bucket where the data will be pushed to in
MinIO. Ideally the information used here should match the one used in theGITLAB_INDEXER_GROUP_TEMPLATE.GITLAB_INDEXER_GROUP_TEMPLATE: The template for the GitLab group where the data will be pushed. This should be the same as the one used in the
S3_URL_PATTERN.
Additionally, you will need to uncomment the following lines in the
BIDS-flux.ymlfile corresponding to the service deployment.# # this service requires: # # - gitlab instance to be started # # - deploy to be run to have containers repo fork # # - ni-dataops/containers to have completed containers build so that image below is in registry # dicom_endpoint: # image: ${GITLAB_REGISTRY_PATH}/dicom_indexer:latest # # hostname: storescp # # profiles: [dicom_endpoint] # depends_on: [gitlab, gitlab-runner-proc] # environment: # CI_SERVER_HOST: $CI_SERVER_HOST # GITLAB_BOT_USERNAME: $GITLAB_BOT_USERNAME # GITLAB_BOT_EMAIL: $GITLAB_BOT_EMAIL # STORESCP_AET: $STORESCP_AET # GITLAB_INDEXER_GROUP_TEMPLATE: "{ReferringPhysicianName}/{StudyDescriptionPath[1]}" # S3_URL_PATTERN: 's3://s3.data-server.org/test.{ReferringPhysicianName}.{StudyDescriptionPath[1]}.dicoms' # networks: # - BIDS-flux-net # secrets: # - source: dicom_bot_token # target: /var/run/secrets/dicom_bot_gitlab_token # - source: s3_id # target: /var/run/secrets/s3_id # - source: s3_key # target: /var/run/secrets/s3_secret # ports: # - "$STORESCP_PORT:$STORESCP_PORT" # deploy: # placement: # constraints: # - node.hostname == $DICOM_ENDPOINT_HOST # entrypoint: ["/usr/bin/storescp", "-aet", "$STORESCP_AET", "-pm", "-od", "/tmp", "-su", "", "--eostudy-timeout", "60", "--exec-on-eostudy", "python indexer/index_dicom.py", "--gitlab-url $CI_SERVER_HOST", "--storage-remote", '$S3_URL_PATTERN', "--gitlab-group-template", '$GITLAB_INDEXER_GROUP_TEMPLATE', '#p', '$STORESCP_PORT']
If you are using mercure, you can skip to step 2 at the end of Stack Deployment Stage 2.
Stack Deployment Stage 2
As promised you can now deploy Mercure and you can do so with a simple command.
sudo docker compose -f docker-compose-mercure.yml up -d
Here the -f tells docker compose which file to use, -d tells docker to run in detached mode, and up is the command to deploy the mercure services
You can also navigate to the Mercure GUI deployed in
http://<DOMAIN_NAME>:8000and check the status/logs of the services there. If all services are up, you should see something like this: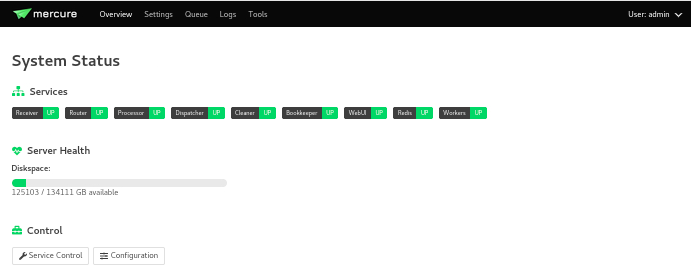
You will need to login using the default credentials:
username: admin
password: router
You can always change the login credentials in the GUI settings.
Note
Alternatibly, you can check if the mercure services are running check the logs running:
sudo docker ps | grep mercure #identify the mercure related containers and check the logs of the indiviudal containers
sudo docker logs mercure-receiver-1
sudo docker logs mercure-dispatcher-1
sudo docker logs mercure-cleaner-1
sudo docker logs mercure-router-1
Note
Refer to the Mercure documentation for more information on how to configure the mercure services and troubleshooting.
In the GUI, you will be able to see the status of the services, logs, and configure the routing/processing of DICOMS. Which brings us to the next step.
Configure the DICOM receiver rules to properly route/process the received DICOMS.
Navigate to the
Settingstab and go to theRulessection. Here you will be able to configure the rules filtering based on the DICOM tags available.Mercureis very powerful and flexible. You can configure actions to re-route the received DICOMS to another DICOM service, to process the DICOMS, or to do both. The rules can be based on individual MRI series or based on the study (complete set of series in an MRI visit with the same StudyInstanceUID) completion, and how to define series/study completion is also flexible. You can define the study/series completion rules based on the time after the last DICOM transfer, or based on the received series in case of the study-wide actions.Let’s go through the configuration rules of the pre-configured rule.
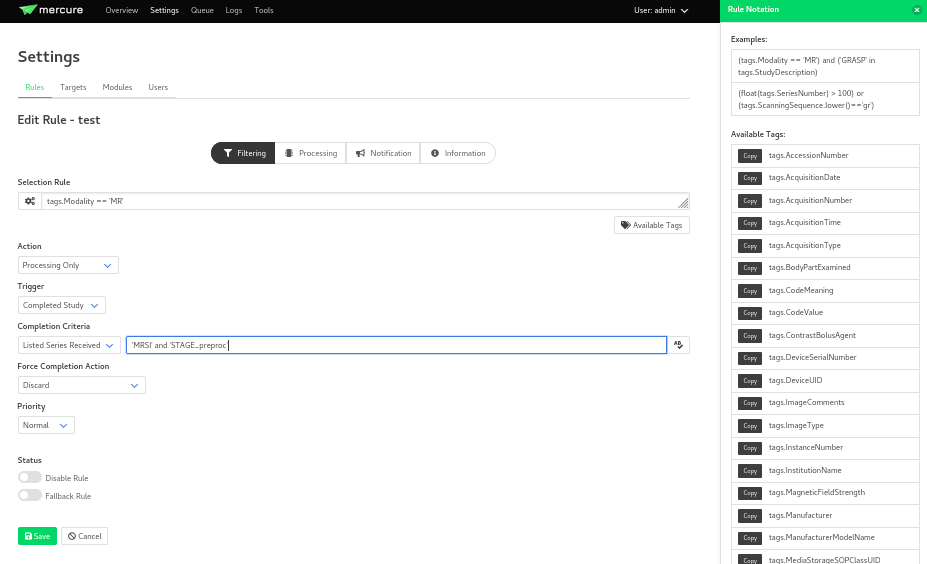
In the selection rule we will indicate what DICOMS will trigger this rule. In our case all dicoms which have the
Modalitytag set toMR. This means that all the DICOMS that are received with these tags will trigger this rule.The trigger is set to
Completed Study. This means that when all the series of the study are received this will trigger the action.The action is set as
Process Only. This means that when the the completion criteria is met we will proceed to process the data.The
Completion Criteriais set toListed Series Received. This means that when the expected series have been received the action will be triggered. In our case we have an example of two series which’s SeriesDescription is ‘MRSI’ and ‘STAGE_preproc’You can also Force an action if the completion criteria is not met. This means that even if the expected series are not received, you can decide what action to perform with the data.
The next configuration needed is the
Mercure Moduleswhich are docker images that will be used to process the data received.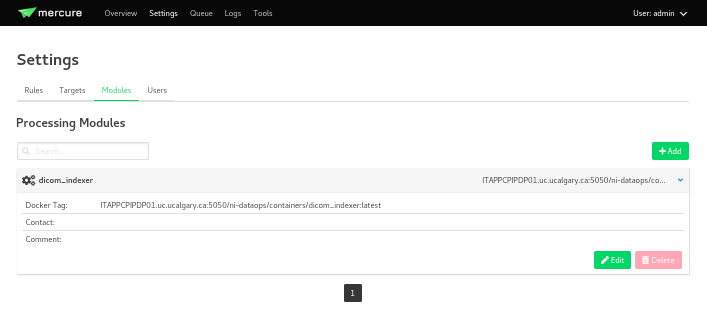
Note
The imaged built for the dicom-indexer module would have been created when we ran the
deploy/init_ni-dataops.pyscript.You can edit this module to better suit the needs for your project.
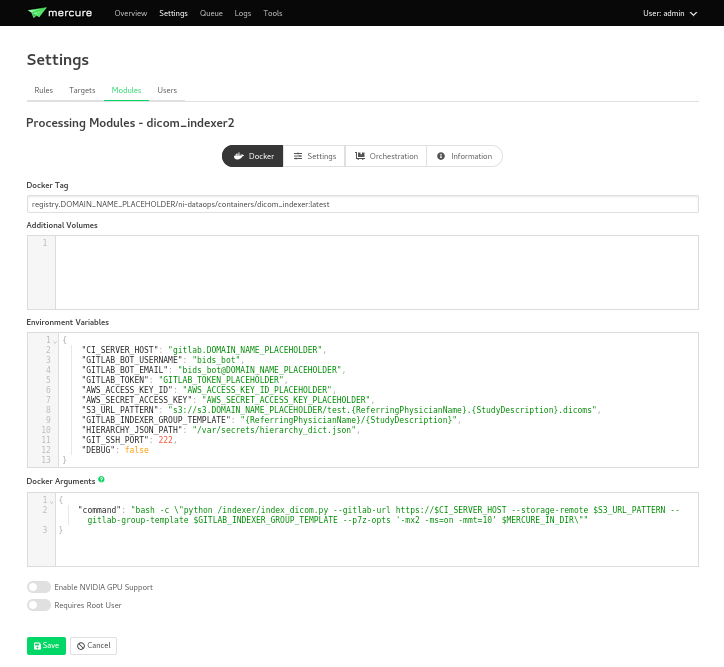
Docker Tag: registry.DOMAIN_NAME_PLACEHOLDER/ni-dataops/containers/dicom_indexer:latest is the name of the docker image that was build in consecuence to the creation of the
containersrepository in Gitlab. Make sure to change the DOMAIN_NAME_PLACEHOLDER to the correct domain name.Environment Variables for the jobs to run whenever the module is triggered. These variables will be passed to the docker container when it is run. You can add any environment variable you want to pass to the container.
{
    "CI_SERVER_HOST": "gitlab.DOMAIN_NAME_PLACEHOLDER",
    "GITLAB_BOT_USERNAME": "bids_bot",
    "GITLAB_BOT_EMAIL": "bids_bot@DOMAIN_NAME_PLACEHOLDER",
    "GITLAB_TOKEN": "GITLAB_TOKEN_PLACEHOLDER",
    "AWS_ACCESS_KEY_ID": "AWS_ACCESS_KEY_ID_PLACEHOLDER",
    "AWS_SECRET_ACCESS_KEY": "AWS_SECRET_ACCESS_KEY_PLACEHOLDER",
    "S3_URL_PATTERN": "s3://s3.DOMAIN_NAME_PLACEHOLDER/test.{ReferringPhysicianName}.{StudyDescription}.dicoms",
    "GITLAB_INDEXER_GROUP_TEMPLATE": "{ReferringPhysicianName}/{StudyDescription}",
    "GIT_SSH_PORT": 222,
    "DEBUG": false
}
CI_SERVER_HOST: The URL of the GitLab instance where the data will be pushed. Make sure to change the DOMAIN_NAME_PLACEHOLDER to the correct domain name.
GITLAB_BOT_USERNAME: The username of the GitLab bot which should also be given access to the data being pushed. Make sure to change the DOMAIN_NAME_PLACEHOLDER to the correct domain name.
GITLAB_BOT_EMAIL: The email of the GitLab bot which should also be given access to the data being pushed.
GITLAB_TOKEN: The token of the GitLab bot which will be used to push the data
dicom_bot. This token was created when we ran thedeploy/init_ni-dataops.pyscript. You were asked to safely store this token Configuration Stage 2.AWS_ACCESS_KEY_ID: The AWS access key ID for the S3 bucket where the data will be pushed. You were asked to safely store this token Stack Deployment Stage 1 under
s3_id.AWS_SECRET_ACCESS_KEY: The AWS secret access key for the S3 bucket where the data will be pushed. You were asked to safely store this token Stack Deployment Stage 1 under
s3_secret.S3_URL_PATTERN: The URL pattern for the S3 bucket where the data will be pushed to in
MinIO. Ideally the information used here should match the one used in theGITLAB_INDEXER_GROUP_TEMPLATE.GITLAB_INDEXER_GROUP_TEMPLATE: The template for the GitLab group where the data will be pushed. This should be the same as the one used in the
S3_URL_PATTERN.GIT_SSH_PORT: The port used to connect to the GitLab instance. This should be the same as the one used in the
.envfile.DEBUG: Set to true if you want to see the logs of the module when it is run. This is useful for debugging purposes.
If you are using storescp then re-run the following command after you have uncommented the lines in the
BIDS-flux.ymlfile.:sudo docker stack deploy -c BIDSflux_stack.yml BIDSflux